Showing posts with label stampotique. Show all posts

Thursday, 26 September 2013

Home Is Where The Heart Is...

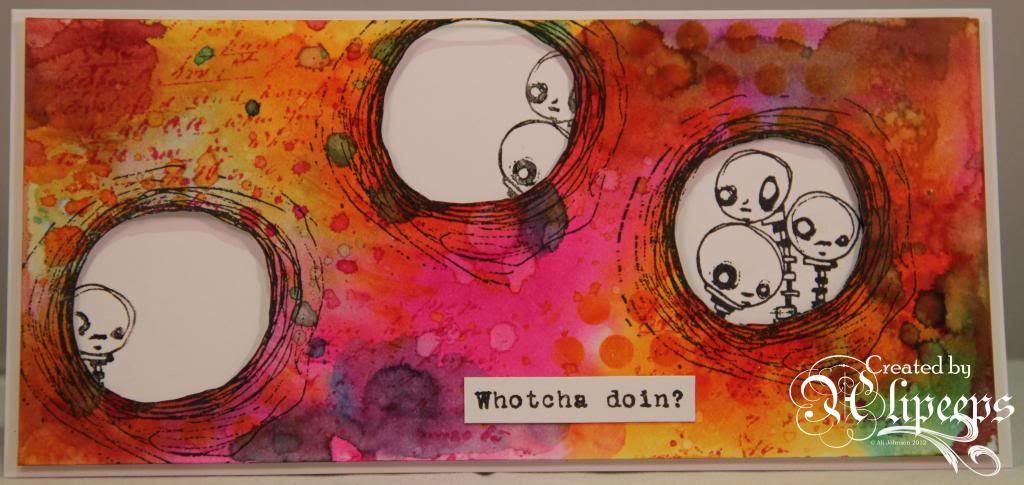
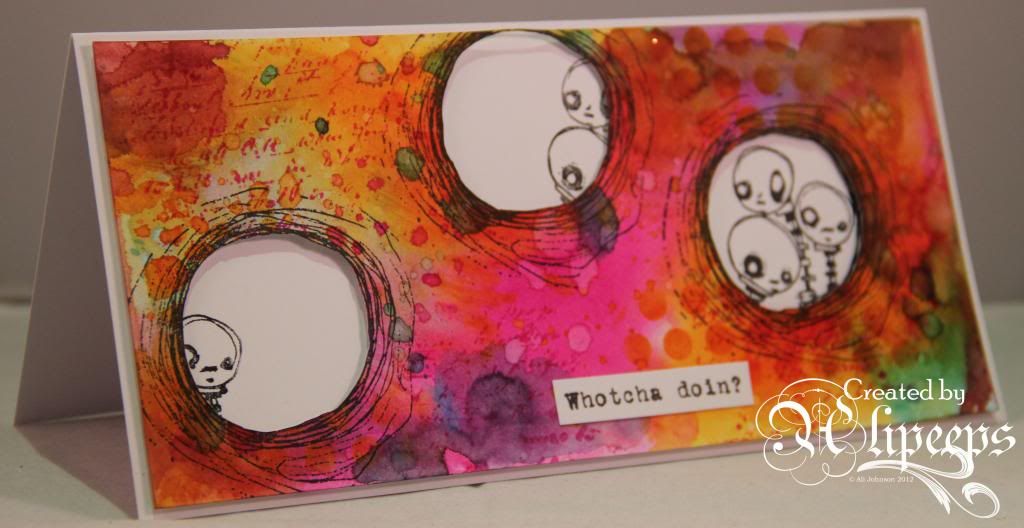
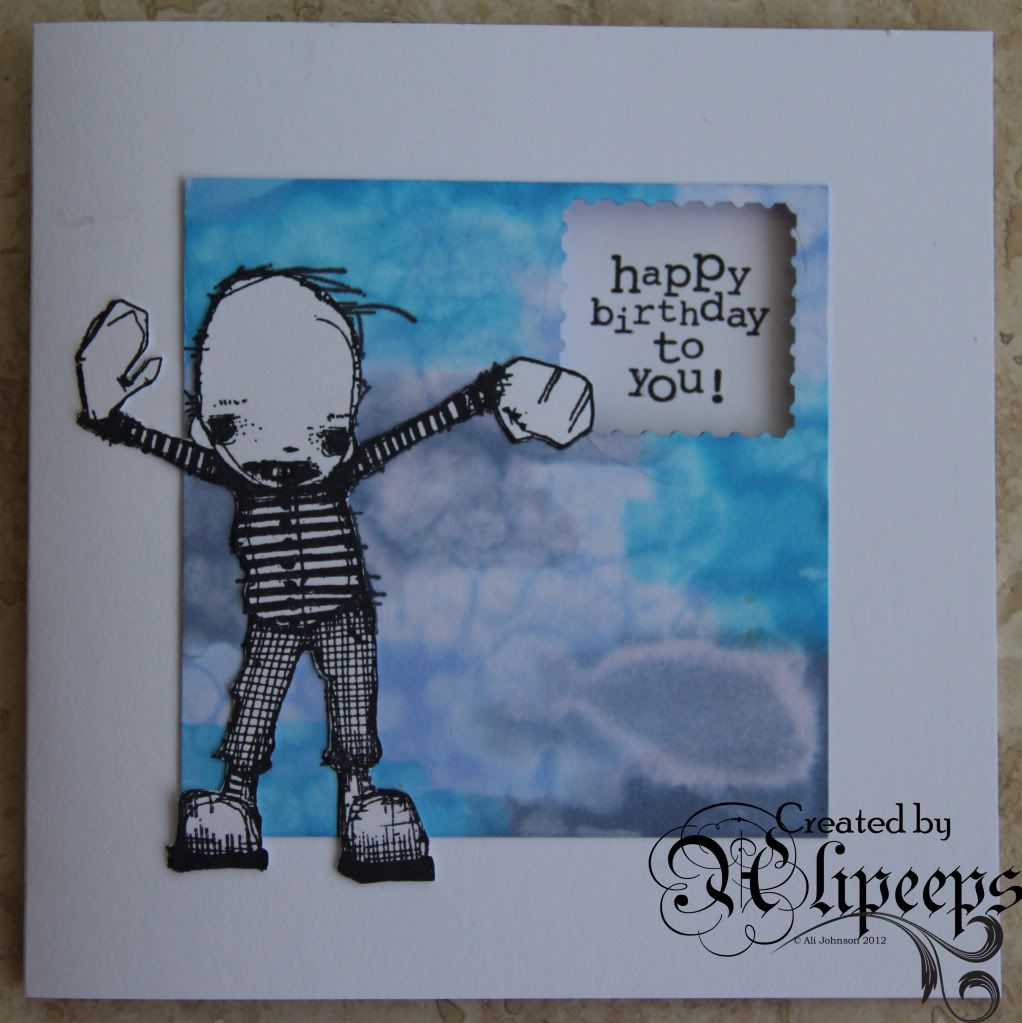
I was recently lucky enough to do a Guest Designer spot for Stampotique. I love their cute and quirky stamps and as they are now having a DT Call for folks to join their Design Team for 2104, I just had to jump at the chance to work with them again. :)
 
So here's a fun little creation I made as a DT Call entry.... *


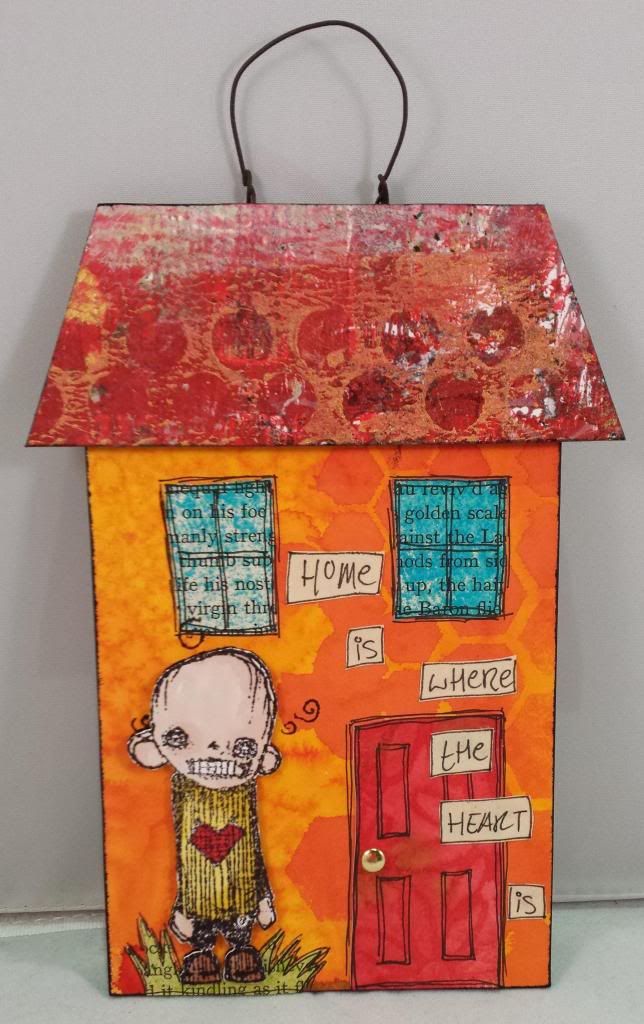
I decided to make a little wall-hanging. :)
 
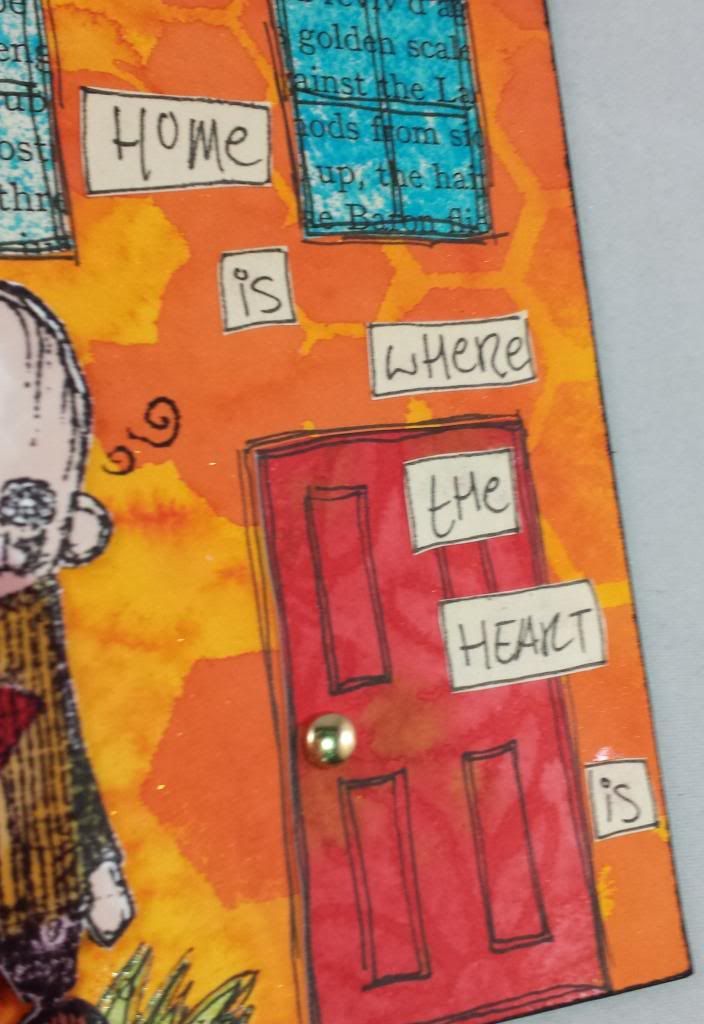
I used one of my favourite Stampotique stamps - Smile - and his cute little heart made me think of the saying, "Home is where the heart is" so I made a little house from thick board.
 
I covered the roof section with a piece of gelli plate print that had a nice texture and "roof-ish" red colour....
 
 
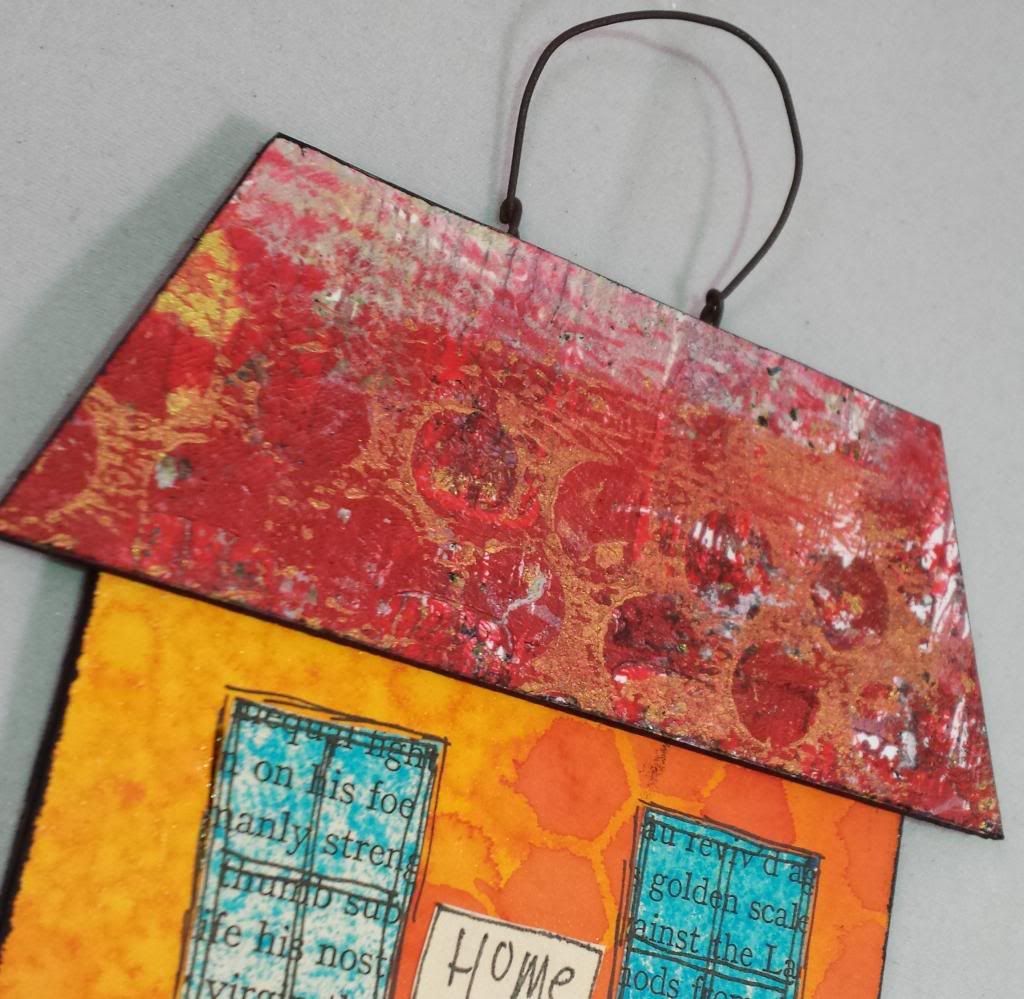
...and I covered the main part of the house with cardstock which I'd coloured using Dylusions sprays and a stencil. I inked all the edges of both parts of the house with black ink before attaching the roof section. I sprayed more card with Dylusions inks in shades of red and doodled a door and doodled windows onto old book pages that I spritzed with more Dylusions in blue shades. I cut these out and attached them to my house and added the sentiment which I hand-wrote onto old book paper and cut out. I cut the top of a gold brad and glued it in place as a doorknob.
 
 
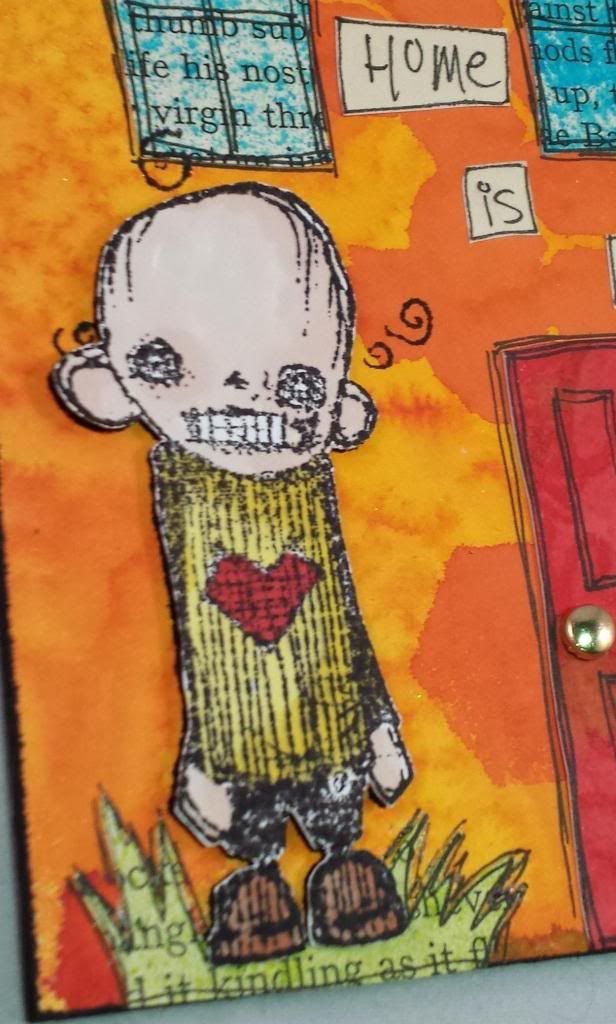
To finish I stamped my image onto the house (to capture the external detail of the image) and stamped him again onto white card, colouring him with my Promarkers before cutting him out and attaching him over the image on the base, using clear sticky pads to give him a bit of dimension. I also gave him a little bit of grass under his feet (doodled and cut from old book pages spritzed with green Dylusions ink) to ground him.*


Finally I attaced a rusted-effect wire hanging to the back of my piece to allow it to be hung up. :)
 
I'm rather pleased with this cheerful, brightly-coloured piece and I hope the good folks at Stampotique like it as much as I do. I love the quirkiness and unusualness of Stampotique stamps. I think my own crafting style is quite changable, depending on the products/medium I am working with, but I do find that working with Stampotique stamps pushes me to be more creative, to play with lots of inking and stamping techniques and making my own backgrounds etc, and to really go to town with colour. :) I really enjoyed doing my GD spot for Stampotique and would love to join the team for a longer period and get the chance to work again with such a lovely, talented bunch of people.

Now I just have to decide where to hang my little work of art.... :)


*I must apologise both for the lesser than usual quality of my photos (my crappy slow netbook has now died meaning that I can't download photos from the data card from my camera so I have had to resort to using my phone to take these photos - thankfully my beloved laptop is being delivered tomorrow after having been repaired so once DH reinstalls the operating system, I'll be back in business!) and for the fact that Photobucket appears to be once again playing silly buggers and randomly rotating or squidging my photos for no reason!! :/ I'll replace these with some better (hopefully, right way up!) photos over the next day or so. :/

Wednesday, 28 August 2013

Whotcha Doin?

Well, the time has come for me to share my fourth and final Guest Designer project for Stampotique which is posted today at the Stampotique Designer's Blog. I've absolutely loved creating my four projects, having lots of inky, messy fun with lots of bright colours and, of course, the fabulously quirky Stampotique stamps. I'd like to thank Kim and the team at Stampotique for generously inviting me to join them as a Guest Designer.
 
The theme for this week's project is "3 Circles" and this immediately put me in mind of the fab 3 In A Round (6018) stamp, which is one of my favourites.
 
 
I had the idea of cutting out the centre of the image to form an aperture and then stamping the image again behind the aperture. I used a tentfold DL card and cut a panel of white cardstock to fit the front of the card and used Tim Holtz's Wrinkle-Free Distress Technique to colour the card, using Tumbled Glass, Picked Raspberry and Spiced Marmalade Inks. I added some detail by sponging Distress Ink through a stencil and stamping some bits of random text and I then stamped the 3 In A Round image three times onto the inked panel.
 

I cut out the centres of the stamped images and then stamped the full image onto the card front behind the third aperture and stamped just sections of the centre image behind the other two apertures, so it looks like the figures are peeping around the edges before popping up in the final aperture. My Stampin' Up! Stamp-a-ma-jig was invaluable in getting the stamps on the card to line up with the stamps on the inked panel.
 
 
I attached the inked panel onto the card using foam tape and added my sentiment, stamped onto plain white card and cut out - the Wotcha Doin (8970) stamp was just the perfect sentiment for these curious little guys peering out at the world. :) 
 
 
I hope you've enjoyed seeing my Guest Designer projects as much as I've enjoyed creating them.


Wednesday, 21 August 2013

Serendipity

My third project as Guest Designer for Stampotique is up at the Stampotique Designer's Blog today and the theme couldn't have been more appropriate. It's "Wedding" and it just so happens to be my wedding anniversary at the end of this month. :)
 
So my lovely hubby will be getting this card:
 
 
I used this great vintage image stamp called Hochzeit (German for wedding, dontcha know?) for my card:
 
 
I made a square card blank from grey cardstock and cut a smaller panel from white cardstock. I stamped the Hochzeit stamp in black Archival ink over one edge of the panel and stamped it again onto a post-it note and cut it out to mask off the image. I then spritzed the card with Dylusions spray inks and splattered watered-down black paint across it.
 
 
I doodled a border with a black fineliner pen and attached the panel to my card blank. I then stamped Hochzeit again onto white cardstock and cut it out, attaching it to the card with foam pads, off-setting it slightly from the image on the panel.
 
 
I finished things off with a layered die-cut sentiment cut from grey and white cardstock and some black gemstones.
 

Friday, 16 August 2013

A little bit dotty...

I've got a new project up at the Stampotique Designer's Blog this week and the theme this time is polka dots:

 
I decided to do an art journal page. I've had a painty background sitting in my moleskine journal ever since I did a class with Kate Crane oooooog ages ago now, and decided it was long since time I did something with it. :)
 
I started off by adding layers of paint and texture paste through a stencil for a polka-dotty pattern and then stamped some circles using black paint and various bottle tops. I added some Pan Pastels here and there in the stamped circles and over the texture paste. I then stamped around the edges with the Splatter Long (3014) stamp.

 
I stamped the Jeepers face onto scrap paper and drew on a body. I also stamped Bla Bla Bla (6001) across the body. I then coloured her in with Promarkers and cut her out to attach her to my page.

 
To finish I had wrote journaling and cut it into strips, edging them with black pen before affixing to the page.


I love the bright colours and business of this page... which ties in perfectly with my journaling... which is a pretty accurate description of my life right now! :lol:

Wednesday, 7 August 2013

Purple, Orange and Yellow

My first project as Guest Designer for Stampotique has gone live today on the Stampotique Designer's Blog - it's a project for the new challenge starting today at the Stampotique Designer's Challenge Blog and the theme is Purple, Orange and Yellow:
 
 
For my project I used a fabulous flower stamp called Carol's Flower, large (9165). I started off making my background by stamping the flower repeatedly over a card panel using Versamark ink and heat embossing with clear embossing powder. I then inked over the panel using Distress Inks in Mustard Seed, Spiced Marmalade and Dusty Conchord. I flicked water over the panel for a blotched, distressed effect, and also flicked some Wild Honey Distress Stain over the panel. I then laid scrap paper over my panel and ironed over it to re-melt and remove the embossing, leaving me with a sort of faux-batique effect.
 
 
I matted my background panel onto black card and attached to a white card blank. I then stamped the flower twice again onto white card, using black Archival ink, and used a wet paintbrush to paint with Distress Inks to colour them in. I cut them out, folded the petals up a little for some added dimension and attached to my card using foam pads, adding some Glossy Accents to the centres for a touch of shine.
 
 
For my sentiment, I stamped Quiet Place (3011) onto white card and cut the wording out into strips which I edged with a black fineliner pen before attaching them to my card.
 
You have until the end of the month to enter any August challenges at the Stampotique Designer's Challenge blog and you don't have to use Stampotique stamps to enter - and you could win yourself some great prizes. :)
 

Thursday, 1 August 2013

Check It Out!

I'm super excited to announce that I'm the Guest Designer for August over at the Stampotique Designer's Blog. I just love their quirky, funky stamps and have had a lot of fun working with them. :D
 
I'll be sharing a few projects using Stampotique stamps over the next few weeks. I hope you'll like them. :)
 

Thursday, 20 December 2012

Winged Things

I had a quick play today and made a cute little ATC using one of my Stampotique stamps:
 
 
I made the background using Distress Stains and stamped the Smile image onto the background, then stamped him again onto white card and coloured him with Distress Markers before attaching him to the background, over the stamped image.
 
I stamped him twice again onto white card and coloured in the hearts and cut them out, attaching one over the coloured image using a foam pad. I attached the second heart, again using a foam pad, to the background and added some wings which I drew onto white card (coloured with Distress Stains) and cut out.
 
 
To finish, I hand-wrote the wording, cut them out and attached to the background and doodled a border with black fineliner and white gel pen.
 
I'm entering this ATC into the Wings challenge at the Stampotique Designer's Blog. :)
 

Sunday, 21 October 2012

Pop It Up!

That's the current challenge at the A Day For Daisies blog and there's some gorgeous freebie musical butterflies digi stamps to download and use...
 
I wanted to keep my card really clean and simple:


I printed and cut out the digi stamp several times in a couple of sizes and then used Distress Inks on my craft mat to colour the largest butterfly. The colours looked so yummy that I thought they'd look fabulous just contrasted against a plain white card. I folded a card blank to make a mini easel card and attached my butterflies so that they were "fluttering" up the card, layering the patterned butterflies over the plain ones and folding up the wings on the top ones.
 
A sentiment stamp (by Stampotique) finished things off nicely.
 
I'm also entering this card into the following challenges:
Addicted to Stamps - Animal Friends
Challenges 4 Everybody - Anything Goes
Stamptacular Sunday - No Rules
The Crafty Pad - Use An Animal
CAS-ual Fridays - Over The Edge


Sunday, 12 August 2012

Paint and glitter

Is there anything more fun? :)

I wanted to have a play with paint because of the fun "Paint It Up" challenge at Simon Says Stamp and Show this week. But I also desperately wanted to have a play with my new summer colours Distress Inks... ever since I saw them used in this project by Sarah Engels-Greer, I just *loved* the colours and decided I had to have them! And they arrived this week. :)

So this is what I made:


Aren't the colours just lush?

I cut a piece of card and used Tim Holtz's Wrinkle Free Distress Technique (from the fab Chemistry 101 online class I did earlier this year) to make the background and then stamped some abstract foliage around the bottom using Jo Capper-Sandon's Splatter Long stamp from Stampotique and then stamped and embossed the sentiment (another Stampotique stamp).

I also used the Distess Inks to paint in the stamped dragonfly and added a layer of magenta Stickles over the top before cutting it out.

I added paint into the mix by dabbing little "flowers" of Paper Artsy Fresco paint across the foliage, adding dots of more Stickles on top.

I used the same paint to paint a larger piece of card and then stamped the edges using a Tim Holtz foilage stamp, and added some more Stickles. Both pieces of card were then matted onto black card.

To finish off, I added a piece of ribbon, mounted the whole piece onto a card blank and added a couple of metal pen nibs which I'd painted with Vintaj Patinas (curse you, Craft Stamper magazine, you keep making me buy new stash! :lol:). Et voila!

I'm entering this card into the following challenges:


Monday, 30 July 2012

Victoriana Goes Pop!

I've been busy crafting away on a few different projects lately but nothing I can share atm... however, I did find time for a bit of a play tonight and made a quick ATC:


I used my new Promarkers for this ATC... they are a limited edition set of summer colours that I stumbled across in Hobbycraft the other week and just had to have them! They're so bright and juicy (and a lovely contrast to the gloomy weather we've had for most of the "summer" here in the UK!).

I also used my Wendy Vecchi stamps that I bought a few months ago and hadn't gotten around to playing with yet. I used the Promarkers and alcohol blending solution (love this technique!) to make the background and stamped over it with the Wendy Vecchi background stamp, using turquoise Archival ink. I then stamped the Stampotique "Bla bla bla" stamp randomly over the background. I stamped the flower part and the victorian lady onto card and coloured them with Promarkers, cut them out and layered them onto the card.

I rather love the result. It's kind of steampunk meets pop art! :lol: Victorian lady a la Andy Warhol! :D

I'm entering this card into the current "Hey Girl" challenge at Simon Says Stamp and Show and the "Feeling Fruity" challenge at Passion for Promarkers.

Friday, 6 July 2012

Grrr... men!

Why are they so difficult to make cards for?! :lol:

And while I'm ranting... grrr... weather! It's July and we're currently experiencing what seems to be a monsoon out there! The front drive is a boating lake, it's so dark we've got all the lights turned on and (I'm not sure whether this is related) our landline has stopped working - it's just making awful crackling noises.

It's also a real pain trying to photograph craft projects when the light is so poor. Even in my nice, light and airy conservatory, the light is very dull and grey today.

So I've had to resort to photographing this card on my craft desk with the daylight lamp on:


As a comparison, this is how it looked when I tried to photograph it in the consevatory:


Anyway, crummy weather aside, this is a funky little card that I've made for my mum's partner's birthday. Men's cards can be difficult so I decided to keep it simple and bold, using a funky Stampotique stamp and a background made by colouring a piece of card with Promarkers and dripping/squirting alcohol ink blending fluid onto it (a technique I've not tried before). I used my Stampin' Up! postage stamp punch to punch a hole in the card front and stamped the greeting inside the card so it was visible through the hole.

I'm entering this card into the current challenge ("outside the box" - the very clean and simple look is a bit different for me and I've also used a technique I've never tried before) at the Stampotique Designers Challenge. :)

Wednesday, 21 March 2012

Watery Wearable Art

The current challenge at the Stampotique Designers Challenge blog is to create some wearable art. As soon as I saw the theme, I had an idea. I had an image in my head of the effect I wanted to create with this project and I'm pleased to say that it came out pretty much exactly as I imagined:

I've had this rectangular pendant (from Crafty Individuals) sitting around for ages and it was perfect for what I wanted to do with this project. It comes with a bevelled glass insert but I decided to use UTEE instead to fill the frame. My idea was to use my Smushallaum mermaid stamp and create a sort of underwater scene - so I cut a piece of card to fit in the frame and made a shimmery, watery background using Dylusions spray inks. I stamped the Smushallaum image onto card and painted her with more Dylusions spray inks before cutting her out and attaching to the background. This was glued into the tray, and then came the really fun part! I started adding layers of UTEE, sprinkling in some fine peacock-coloured glitter as it melted, for that added underwater shimmer. I also added a couple of green gem "bubbles" into the UTEE here and there. I kept going until the tray was filled and then left it to cool.

I love how this looks! I think it has the shimmery, slightly distorted underwater feel that I was going for and I love how the gems encased in the UTEE catch the light in different ways as you turn the piece. Photos really don't do justice to how it shimmers and catches the light as it moves. I am so pleased with this that I'm wearing it as I type! :) I think I may make some more pendants using UTEE in this way, it's a really effective technique.

The Stampotique Designers Challenge is also holding a Guest Designer call - I luuuurve Stampotique stamps so am entering this piece for the GD call as well.. I hope they like it as much as I do! :)

Wednesday, 29 February 2012

Monstrously cute

I just luuurve this cute little monster stamps from Stampotique!! They were featured in Craft Stamper Magazine a couple of months ago and since then I've been dying to get my hands on them! And now I finally have:

For my first play with the key monster, I decided to make ATCs - he's just a nice size for an ATC. I used Dylusions paints and a spritz of Glimmer Mist to make a nice colourful background and added some black paint with a credit card and some netting. I stamped the monster onto white card and coloured him in with Cosmic Shimmer Acrylic Drawing Inks and a silver pen, cut him out and glued him onto the ATC. He has such an adorable bemused expression on his face that I decided to finish the card off with a question mark, drawn onto card and coloured in with silver pen before being cut out and stuck onto the ATC. :)

I'm entering this ATC into the current "Purple/Pink with Black" challenge over at the Stampotique Designers Challenge blog.

Related Posts Plugin for WordPress, Blogger...