Thursday 31 January 2013

New Goodies to Play With....

I love it when the postie/courier brings me pressies. :)
 
My Stampin' Up! order arrived today - a couple of pre-ordered items from the gorgeous new mini catalogue (which goes live tomorrow!) and a Sale-a-Bration freebie. Perfect timing by the UPS man as Thursday is my one day a week where I get a couple of hours to myself during the afternoon, with one kiddy at nursery and the other at pre-school. So of course I just had to have a little play! :D
 
 
I made these two cards using Baja Breeze and Whisper White cardstock, Baja Breeze 1/8" Taffeta Ribbon, Baja Breeze, Old Olive and Pretty In Pink inkpads, Bloomin' Marvellous (a Sale-a-Bration freebie) and That's The Ticket stamp sets, the Ticket Duo Builder Punch and the Honeycomb Embossing Folder.
 
Am particularly loving the embossing folder - isn't it delicious? :)
 

He Loves Me... He Loves Me Not...

Sweet Pea Stamps are sponsoring the current challenge at Elisabeth Bell's World and the theme is Vintage Valentine.
 
The word Vintage pretty much makes me think of two things - Tim Holtz and Basic Grey. So I used both on this project! :)
 
I'm pretty much hooked on anything Tim Holtz, especially Distress Inks/Stains etc, and I just loooooooove Basic Grey so much... I've been in love with their gorgeous papers, and coordinating embellies etc, pretty much since I started scrapbooking. I love the vintage, distressed look to them and how they can manage to give just about every style you can think of - modern, floral, abstract etc - an aged, distressed feel. I have a quite ridiculous amount of their paper collections, partly cos they're just so darn pretty that I find it hard to make myself actually use them! :lol:
 
But for this challenge, I took the plunge and made myself actually cut into some of my delicious Basic Grey papers:
 
 
I used papers from the Lemonade collection and one of the gorgeous new Elisabeth Bell mermaid stamp from Sweet Pea Stamps - this image is called Tide. I coloured her with my Promarkers and inked the edges of the image with Tea Dye Distress Ink.
 
 
I inked the edges of my papers too and distressed the edges of the smaller panel before matting them together and adding a piece of lace. I placed the coloured image at an angle on the card and added some pretty flowers and hat pins and created a pearly border using a Perlen Pen.
 
 
To finish, I hand-wrote a sentiment of sorts in an arch over the image and hand-wrote the main sentiment onto a banner die-cut with Tim Holtz's Tattered Banners die, which I attached with foam pads.
 
 
And that's my Vintage Valentine... just goes to show you that Vintage doesn't have to mean shades of sepia/brown! :)


Fun with Flourishes...

I was immediately inspired by the new challenge theme at Fun With ATCs....
 
The theme is Flourishes and for some reason I immediately thought of using a flourish to depict flowing hair:
 
 
I made the background by blending Distress Inks and flicking with water and I hand drew the face onto copier paper and coloured it in with Prismacolour pencils. I stamped the flourish (from the Everything Eleanor stamp set from Stampin' Up!) a couple of times using black Archival ink and then glued the face in place and, to finish, stamped parts of the flourish over the face.
 

Wednesday 30 January 2013

My gorgeous girls...

My DD2 turned two on Christmas Eve and on the day of her birthday we took the girls along to have some professional portrait photos taken. They came out gorgeous... which means I now have a bunch of beautiful photos to scrapbook. :)
 
This is one of my favourites:
 
 
I made this digital scrapbook page using the Lovely Visions kit from Creative Victorian Designs. :)

Clean and Simple Christmas

I seem to be feeling the Christmas inspiration recently. :) I've already made one Christmas card for Creative Craft World's Beat the Christmas Rush linky party and now here's another one...
 
This one was very much inspired by this gorgeous digi stamp by Rebecca Sinz, one of the new releases at Sweet Pea Stamps. She's called Holly and as soon as I saw her I thought what a striking, unusual Christmas card she'd make (I love the way Rebecca draws faces, and her moody, gothic style). You can buy this image in digi format right now and you can pre-order (at special reduced pre-order price) the red rubber version, which will ship in February).
I coloured the image with my Promarkers, giving her festive red hair and a touch of goth-y eye make-up. :) I then trimmed the image to a rectangular shape and cut two more rectangles of the same size from white card which I then embossed using a snowflake embossing folder. I attached the three panels to a sideways DL card blank using foam tape and then cut a title from red cardstock using my Cameo.
And that was my clean and simple - but striking - Christmas card. And I've now got two Christmas cards done and it's only January! Go me! :)
 

WOYWW 191

This morning's photo finds my work desk mid-create... mid-several-create in fact!
 
 
There's a scrapbook page in progress on the (increasingly cluttered) work area and scattered about the desk there are also a couple nearly-finished cards and several coloured images waiting their turn to be turned into cards. :)
 
And after taking this photo, I also started work on an ATC! :lol: My head is just swimming with ideas at the moment, hence why I'm working on about 5 or 6 projects at once! :D
 
I tried to make it around as many WOYWW desks as I could last week but still didn't seem to manage to get very far! So my apologies... must try harder this week! :D


Sunday 27 January 2013

Time for a Party

The new challenge today at One Stitch at a Time is a perennial favourite - Use a Digi.
 
For my card I used this cute Corey image by Stitchy Bear creator Beary Dust Stamps:
 
 
I decided Corey looked like she was having a lot of fun at a party so I used Promarkers and coloured her in in shades of bright red and decorated my card to match, with black, white and red patterned paper and a frame (a new Marianne Designs die I picked up recently) and butterfly die-cut from red cardstock. A few flowers and gemstones finished things off nicely. :)
 
 
It's so easy to enter this week's challenge - you just need to use a digi element on your creation, whether that be a digi stamp or digi paper etc. You don't have to use a Stitchy Bear digi stamp to enter but if you do you'll be in with a chance of winning a prize from this week's sponsor. If you enter without a Stitchy Bear image you'll still be in with a chance to win as you'll be entered into the draw for a $3 gift voucher for the Stitchy Bear Store.

I'm also entering this card into the following challenges:
Word Play Saturday - Anything
Simply Create Too - Anything Goes
Stampin' For The Weekend - Something Girlie
Totally Papercrafts - Let's Dance
Craft Us Crazy - Use the Colour Red
Happy Campers - Flowers - Use Something Digital
Paper Crafting Journey - For a Girl
Inspired By - Inspiration Pic

Friday 25 January 2013

Snowy Fun

I felt like crafting tonight... but... it's cold and snowing and I'm tired and the sofa is comfy.
 
So thank goodness for digi-scrapping! :D
 
I took some gorgeous photos of the girls playing in the snow last weekend so decided to use one of them to make this layout:


The paper is from the Watery set of papers by Agnes Biro for Design House Digital, the stitched label is by Gina Cabrera for Digital Design Essentials and all the other elements are from the Winter's Deep kit from Creative Victorian Designs.
 

Beat the Christmas Rush

"What's this?" I hear you cry. "Christmas? Already? Didn't we just do that?!"
 
Well, yes, we did, and wasn't it fun? ;) But here's an idea to make next Christmas a little bit.. well... perhaps, a bit less stressful. Cos if you're anything like me, you promise yourself every year that this year you're going to be organised and start making your Christmas cards early so that you're not rushing around at the last minute. And then, next thing you know, it's December, you haven't made any and, yes, you're rushing around at the last minute and desperately looking up the last posting dates for Christmas. ;)
 
So to help us all out with this little conundrum, the team at the Creative Craft World blog are launching a new monthly linky party called Beat the Christmas Rush. The idea is that each month of 2013 you try and make at least one Christmas card - or more if you get the chance. On the 25th of the month (see what we did there? ;D) there will be a BtCR post on the CCW blog with the Design Team sharing their festive makes to help inspire you and a Mr Linky where you can link up your own blog posts of your Christmas Cards.
 
It's gonna be fun, there's gonna be prizes to be won (details on the CCW blog), and at the end of it all, you'll find yourself approaching Christmas 2013 with a stash of Christmas cards already made! Woohoo! It's a win-win. :)
 
So to kick things off, the inaugural BtCR post can be found at the CCW blog here and here is my first Christmas Card of 2013!
 
 
The image is a fab digi stamp from Stitchy Bear Stamps coloured with my Promarkers, the papers are magazine freebies by Kaisercraft and the ribbon is a scrap that's been hanging around my ribbon drawer for forever! :)
 
Ooh and before I go, as part of the BtCR fun, each month the members of the CCW Design Team will be also picking their favourite card from those linked up in the previous month's BtCR linky party. Obviously, this being our first BtCR, we don't have previous entries to choose from so instead the DT have scoured blogland/Pinterest etc for cards that have caught their eye. And here's the one I've chosen to feature:


I found this gorgeous card by Joy Taylor on Pinterest - I love the clean and simple lines of this card and all the delicious texture.. dry embossing, heat embossing, baker's twine. Lush. You can read all about how she made this card on her blog post here.
 

We're All Mad Here...

I seem to be having a bit of a thing for Alice in Wonderland today. :)
 
As well as making my Cheshire Cat bookmark, I also decided to have a play with Ching-Chou Kuik's gorgeous Cheshire Cat Illusion image (available as a digi stamp or red rubber stamp from Sweet Pea Stamps).
 
 
I used the digi stamp and coloured it with my Promarkers:
 
 
I made a tentfold card base from pale blue cardstock and embossed a panel of white card using a Tim Holtz Texture Fadez embossing folder (I don't know why exactly but the circular pattern on this folder put me in mind of the song "Windmills of My Mind" (...and the circles that you find... in the windmills of your mind) and of Alice tumbling down into the rabbit hole). I wrapped some baker's twine around the embossed panel before attaching it to the card base and then matted the coloured digi stamp onto more pale blue card and attached it with foam tape, letting it overhang the side of the card. To finish, I added some pale blue gems to the centres of the circles on the embossed panel.
 
A fairly quick and simple card that allows the striking image to take centre stage. :) I'm also entering this card in the We're All Mad Here, So Anything Goes challenge at The Altered Alice.
 

Say Cheeeeeeese!

The challenge theme this week at the Dilly Beans Designers and Friday Challenges blog has been Bookmarks. Not something I've really made before but I liked the idea and I had a look through my collection of Dilly Beans digi stamps and had a bit of an idea....
 
I decided that this fabulous Cheshire Cat digi would make a fantastic bookmark on all his own:
 
 
See what I mean? He's made for the job! He's long and thin and his tail is just the right shape to hook over the top of a page. :)
 
So I printed him out nice and big and coloured him in with Promarkers and a white gel pen. I glued him onto a sheet of thicker card, for added durability, cut him out and gave him a little hand-written sign (probably his most famous quote). To finish off I gave him a coating of clear embossing powder, for a nice protective sheen. Isn't he great? I love his sleepy-eyed, knowing grin.
 
And here he is in action, doing his thing:
 
 
And as I think he's so cool, and cos he's such an iconic Alice in Wonderland character, I'm also going to enter him into the We're All Mad Here, So Anything Goes challenge at The Altered Alice. :)
 

Thursday 24 January 2013

Let Me Look Into My Crystal Ball.....

When I saw the Anything But a Square challenge at Sparkle and Glitter the Rick St Dennis Challenge Blog it sparked a bit of an idea in my brain...
 
I looked at the fabulous digi of Esmeralda, holding her crystal ball, and had the idea to put her in a crystal ball of her very own. This was the result:
 
 
I printed her on white card and coloured her in with Promarkers and used a Flexmarker for a pale blue colour wash around her and added Stickles to her crystal ball. I drew a circle around her (using the lid from my kitchen blender as a template, as it happens! :lol:) and cut it out and then coated the whole panel with a nice thick layer of UTEE for a glass/crystal effect. I also added in some fine gold glitter during the process of melting the UTEE:
 
 
I stuck the UTEE'd panel onto thick chipboard to give the card some strength and added some highlights with Stickles.
 
I had-drew the base section onto white card and coloured it with Promarkers. I then made a sturdy stand from thick cardboard and fixed the base and the UTEE'd panel onto it and printed a greeting inside a banner shape using my computer, cut it out, and attached with a foam pad.
 
 
I'm really pleased with how this came out. :) It was fun doing something really different and a really unusual shape and most of all I'm pleased with the results of my UTEE experiment... somehow the layer of UTEE seems to have given a richness and sheen to the Promarker colours, they seem to almost glow:


I'm also entering this card into the following challenges:
 

Wednesday 23 January 2013

Angelic

My card for Sweet Pea Stamps this week features Rachel Anderson's beautiful Angelic digi stamp. It's such a pretty, delicate image and there's something very poignant and even melancholy about this solitary angel crouching in the waves.
I coloured the figure with my Promarkers, using soft pastel colours and lots of white space for a soft, almost bleached-out look, and used Flexmarkers for a really pale, subtle background:
For the card I used a white 8x8 card blank and some pretty Craftwork Cards papers that toned really well with my colour scheme on the digi image. I added a punched border, some lace and pearls, some vellum banners (also from Craftwork Cards) and some pretty Melissa Frances resin corners.
A fairly simple card that lets the beautiful image take centre stage. :)

WOYWW 190

There's been some experimentation going on in the craft pit recently... and the evidence is still lurking on the desk:
 
 
There's my very first print using my new Gelli plate - messy fun, definitely need to play with it more! - and a bit of an ongoing experiment involving a digi stamp, Promarkers and UTEE. Results to be shared tomorrow, I hope, when the project should be finished.
 
I have been crafting quite a bit this week but, as often seems to be the case lately, can't share much of it as it's design team stuff. However, before I toddle off to bed, I will share a card that I made recently and didn't put up on the blog because I wanted to be certain the recipient had received it first.
 
Not that my mum ever actually reads this blog but still...
 
It was her 65th birthday on Sunday and I had a play with my Stampin' Up! stash and made her this card:


I love fussy cutting and layering SU stamps and papers. So much fun and so pretty too. :) She liked the card and, by the sound of things, had a good birthday. 
 
So Happy Birthday Mum. :)
 

Tuesday 22 January 2013

Oh the weather outside is frightful...

...but in here it's so delightful... :)
 
A Christmas song, I know, but nonetheless appropriate. Everything's still very snowy out there but it's nice and warm in here. :) Technically, we should be out and about in the snow this morning (thank goodness we have a 4x4!) but I've skived off going to DD2's Rhythm Time class this morning cos I am absolutely shattered... I stayed up too late crafting, which wouldn't have been a problem, except DD2 chose last night to wake up in the early hours and shout the place down. So instead of getting 6 hours sleep, which I could have lived with, I got 2 lots of around 3 hours sleep. Which has left me feeling like death warmed over. Eeesh.

Anyway, here's what kept me up late last night. I made this card for this week's Whatever the Weather challenge at Passion for Promarkers:
 
 
I used a sweet digi stamp from A Day For Daisies and coloured it with my Promarkers and used a Flexmarker for a wash of colour in the background:

 
I used magazine freebie papers (as ever! :lol:), pale yellow pearlised card and a doily and finished things off with some blossoms, gemstones and a yellow bow (that I upcycled - I have a handful of these that I was given along with the ownership certificate when we bought DD1 a teddy from Build a Bear Workshop! :lol:)


I'm also entering this card into the Add Some Red challenge at A Day For Daisies. :)

Sunday 20 January 2013

Mini Kit Challenge

It's time for more fun with mini kits at the Creative Craft World blog today with the new mini kit challenge.
 
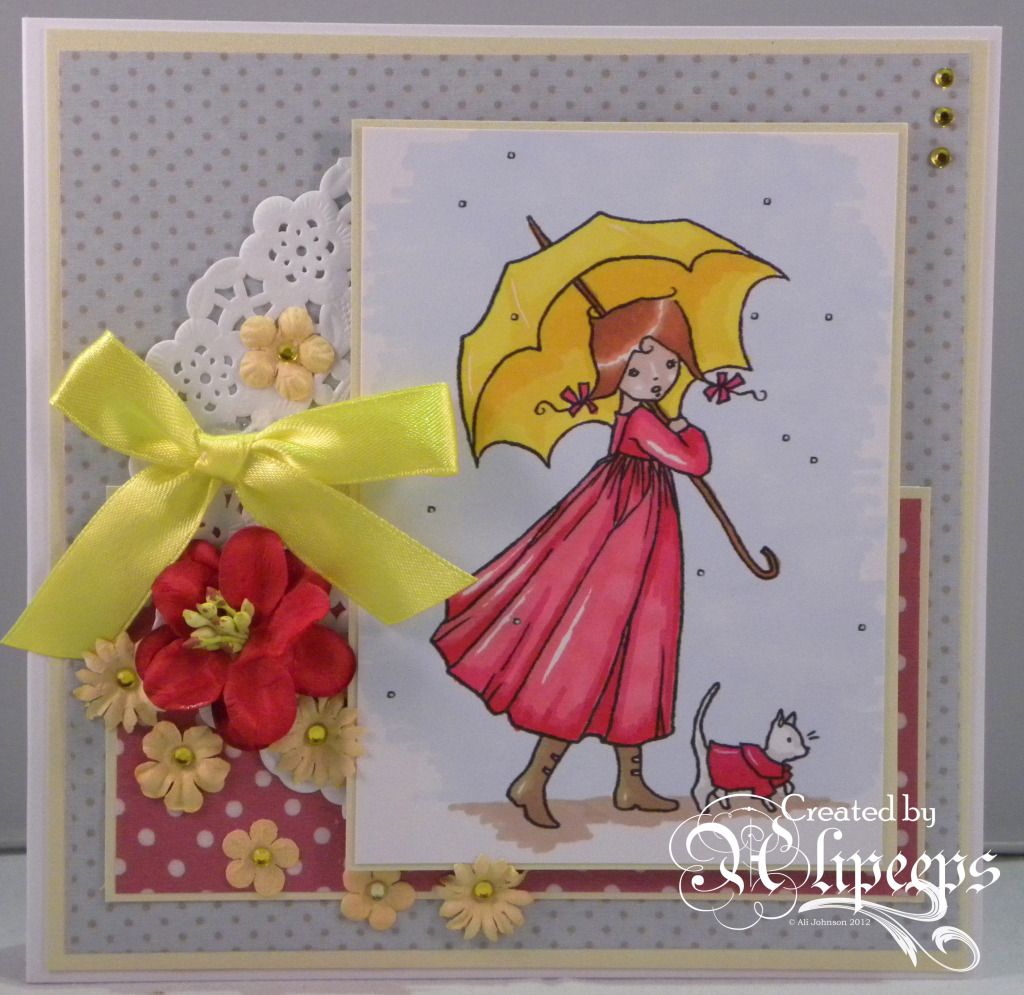
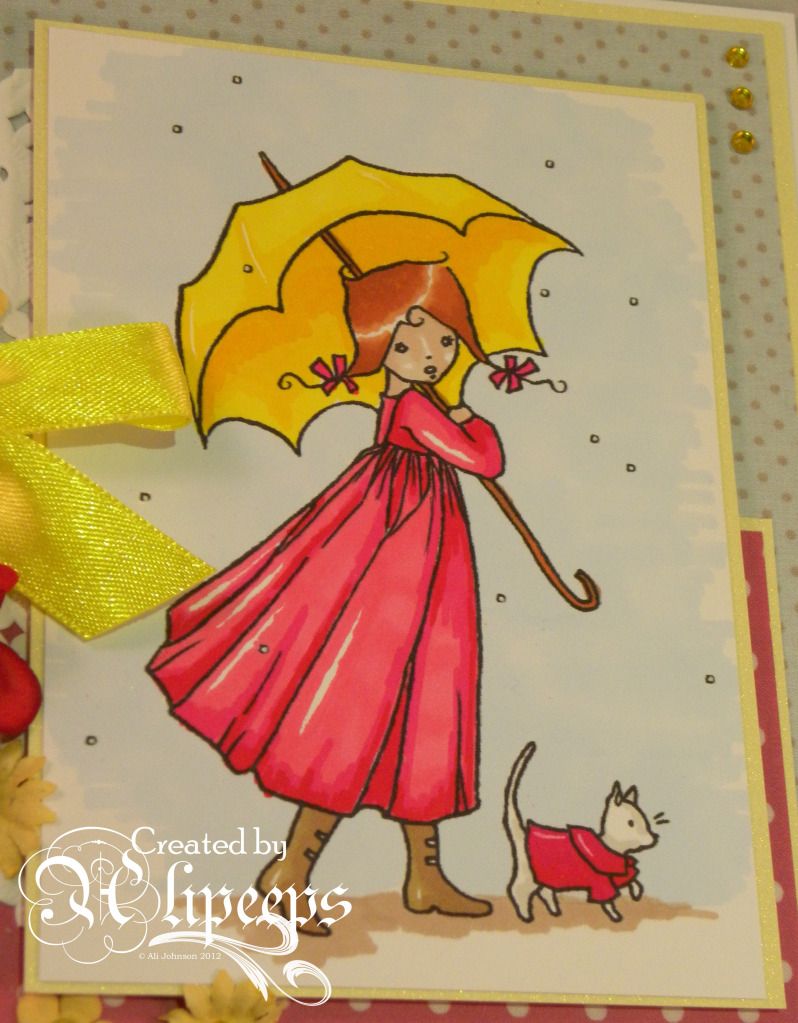
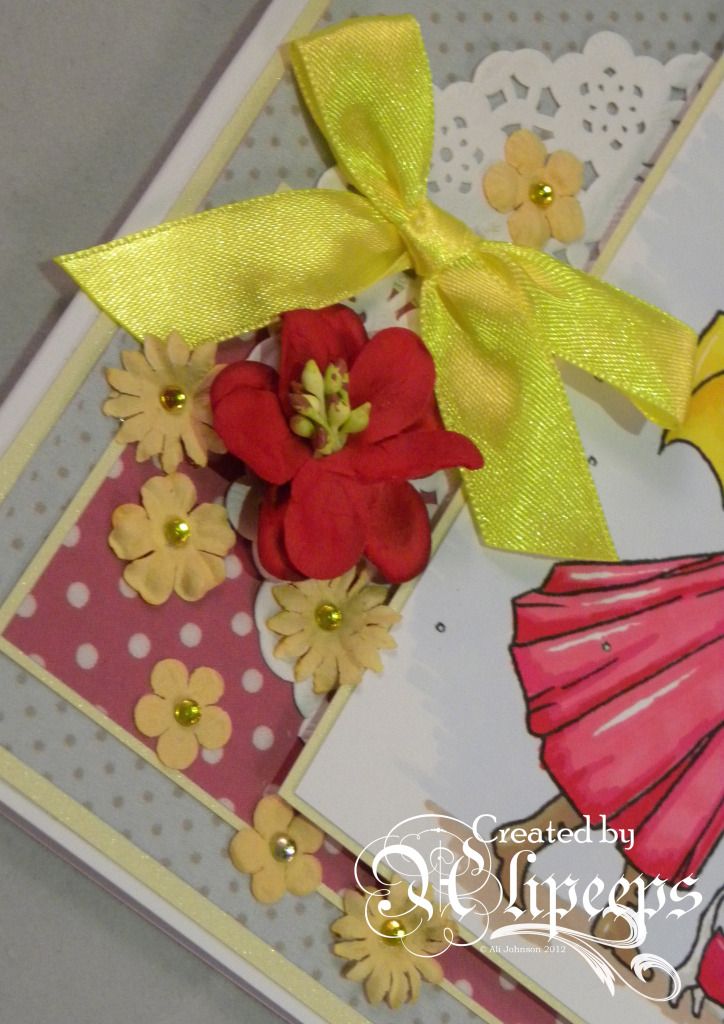
The DT were given a gorgeous mini kit to create with and this is the result of my endeavours:
 
 
I made 3 cards (and tbh have enough bits left over to probably make another 2-3! :D). I loved the colours in this kit - the warm brown and creams, with a touch of soft yellow, are perfect for either masculine or feminine cards. I'd like to think that my creations could be just as suitable for a man as for a woman - which just goes to show you that with the right papers/colours, even butterflies can work on masculine cards! :)


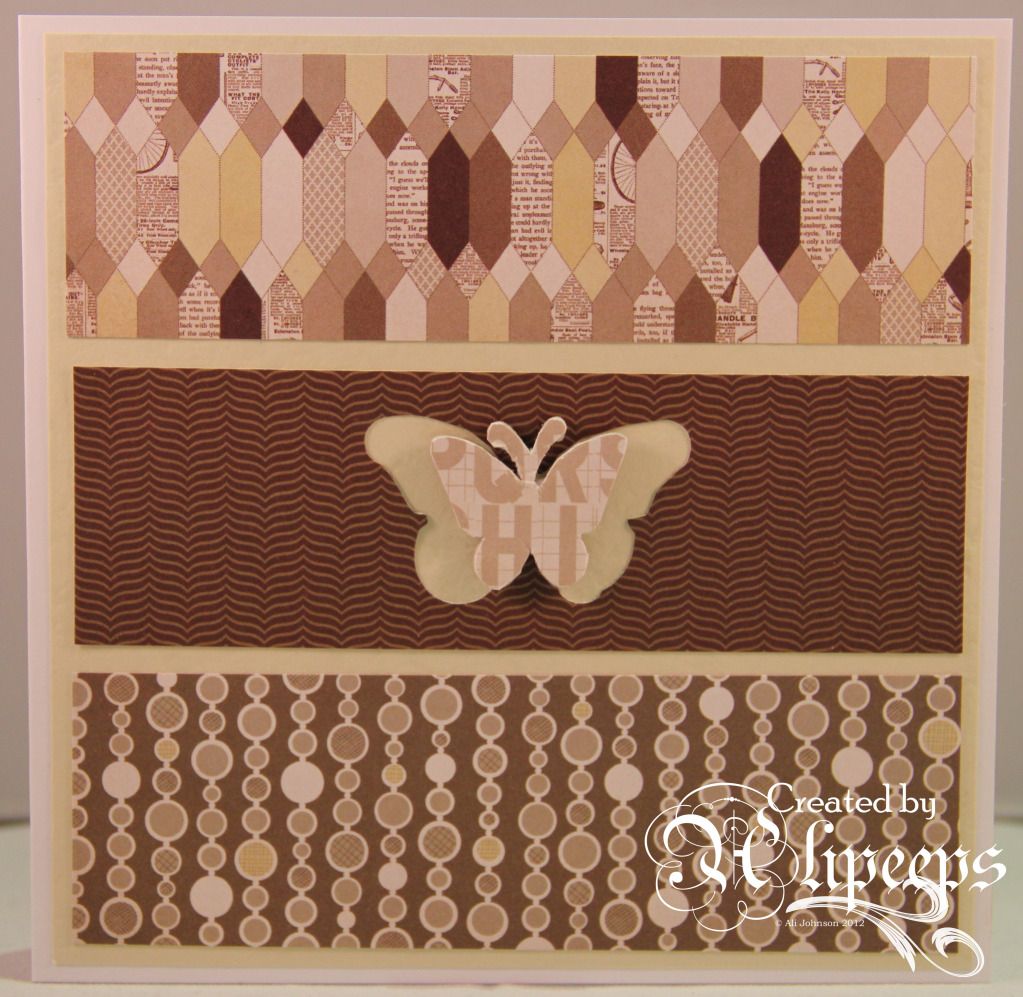
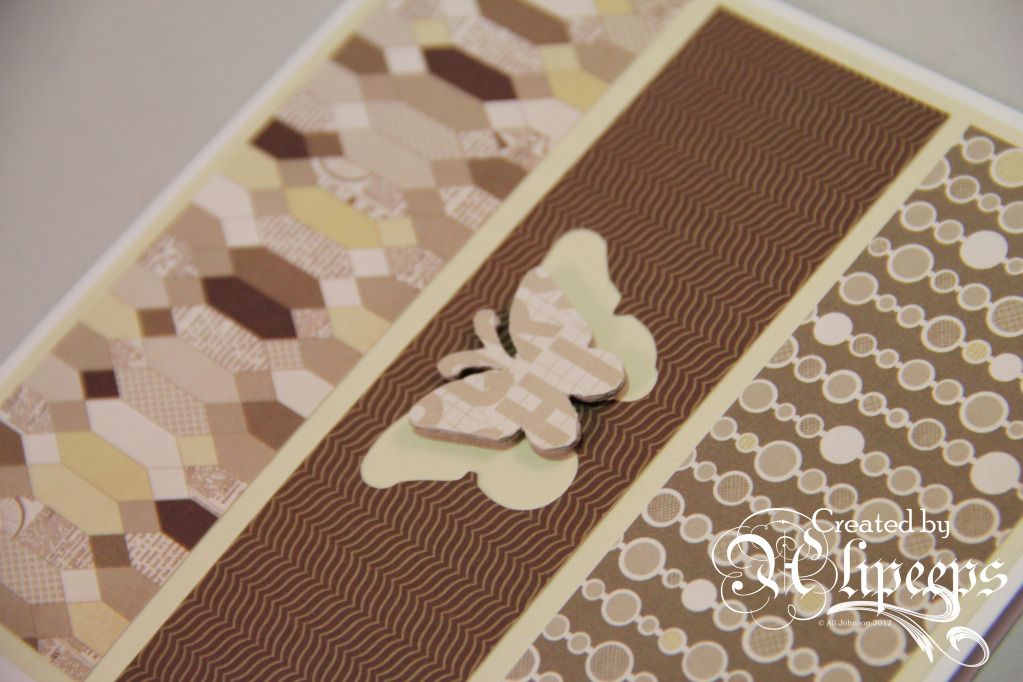
For this card I used three strips of patterned paper against a cream card base. I used a Tim Holtz Movers and Shapers die to cut a butterfly shape out of the centre strip. I covered one of the chipboard butterflies from the kit in more patterned paper and attached it over the butterfly apperture.


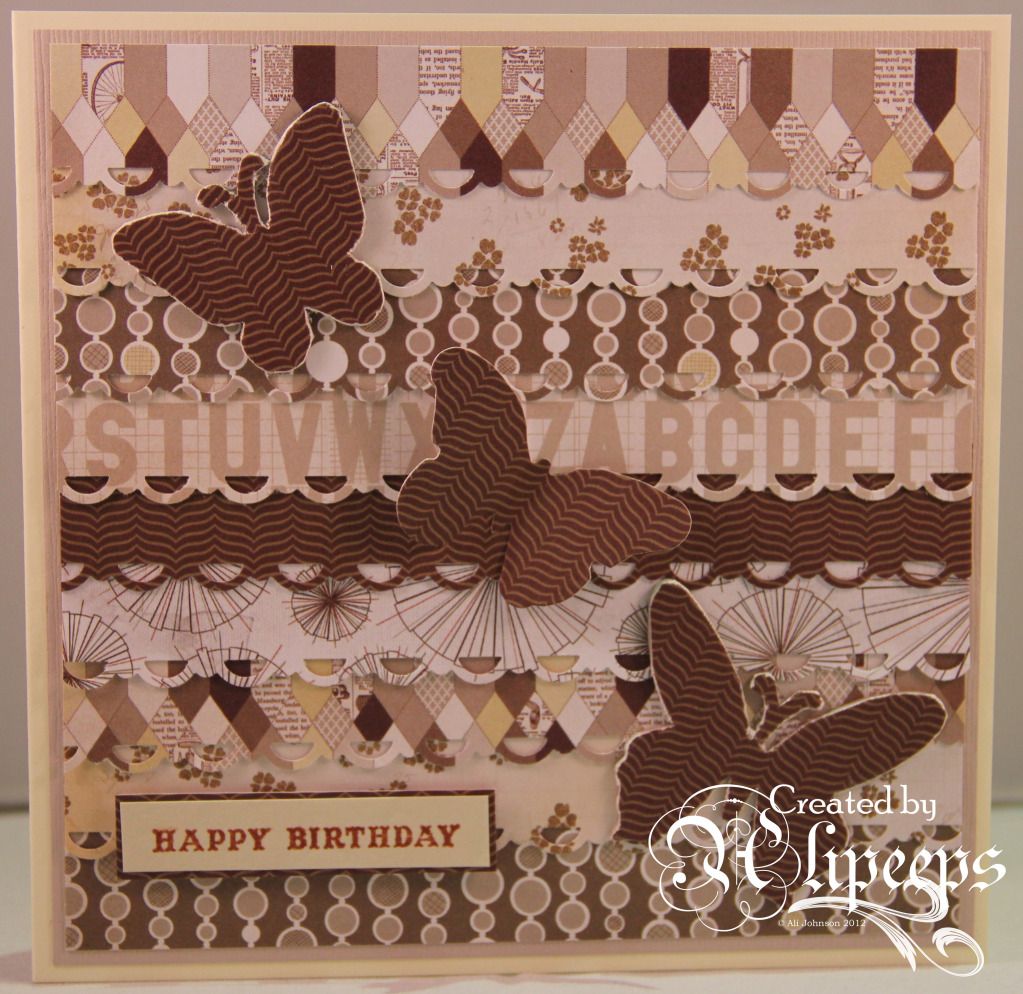
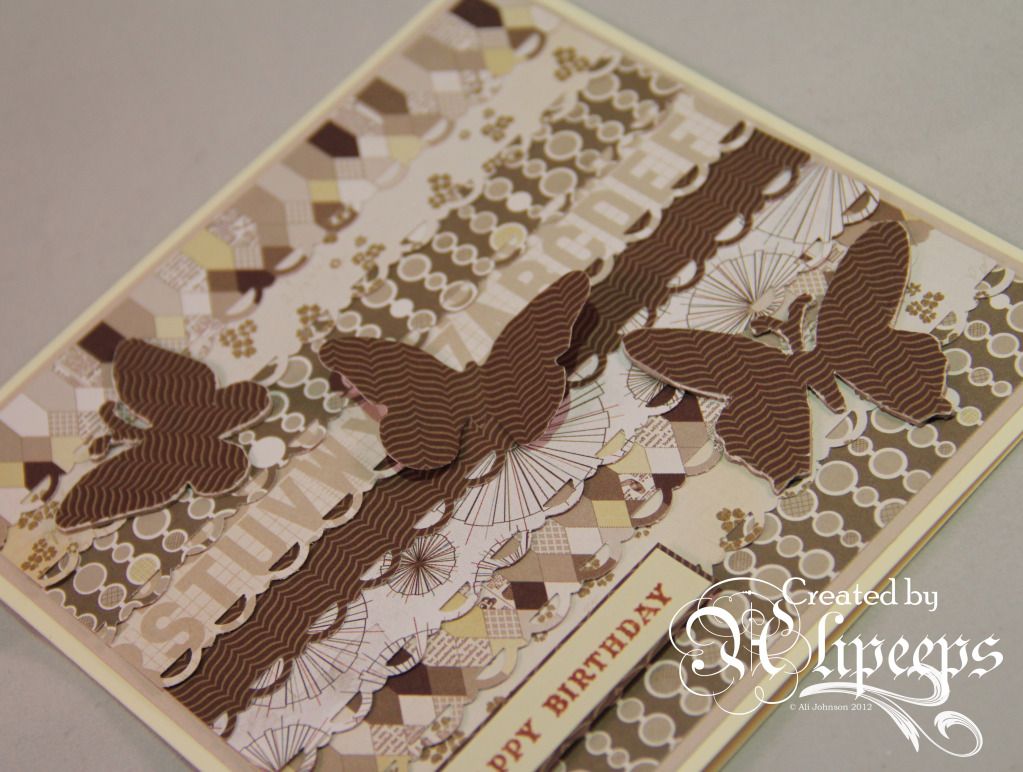
On this card I went mad with the patterned papers, layering border-punched strips of all the papers from the kit onto a beige card base. I covered two more of the chipboard butterflies in the dark brown patterned paper and added them to the card, along with the butterfly shape I'd die-cut out of the paper stip for the card above. To finish I stamped a sentiment onto cream card, matted it onto patterned paper and attached with foam pads.


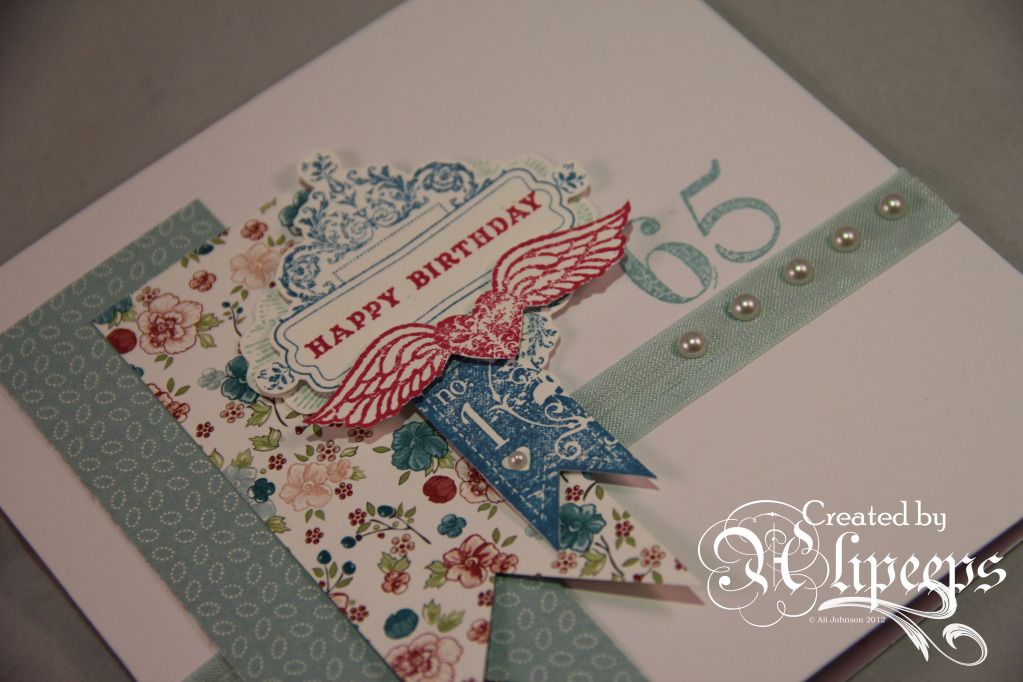
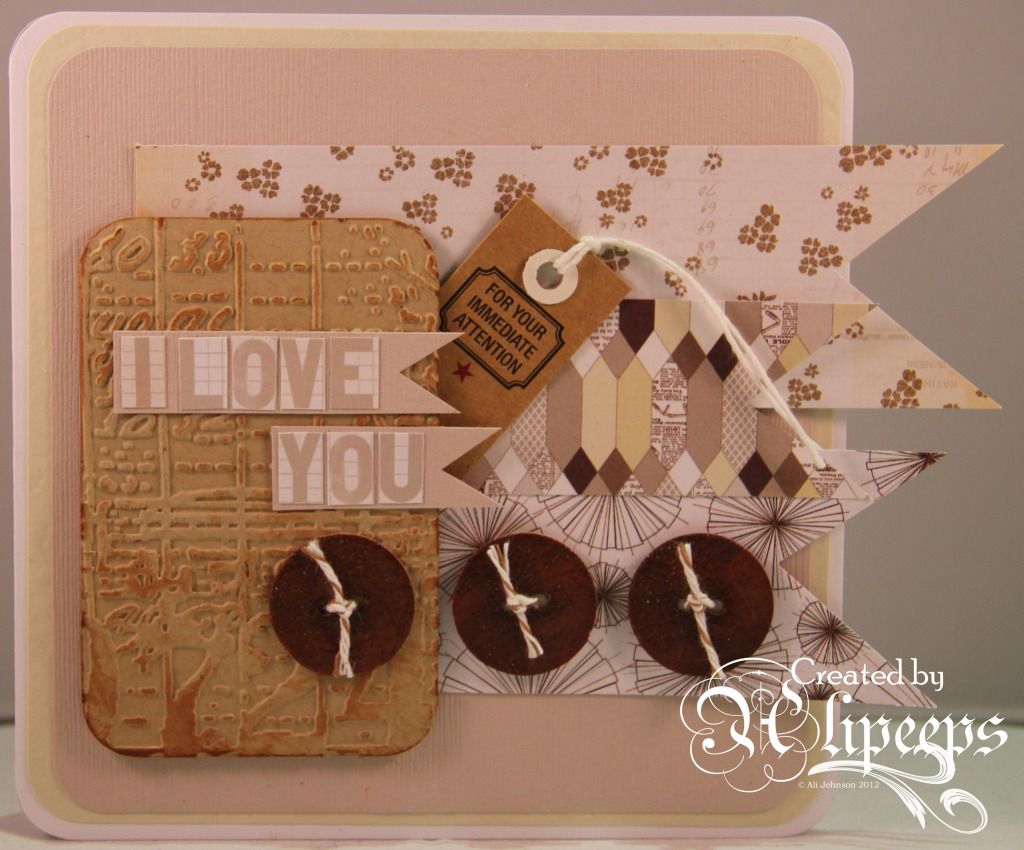
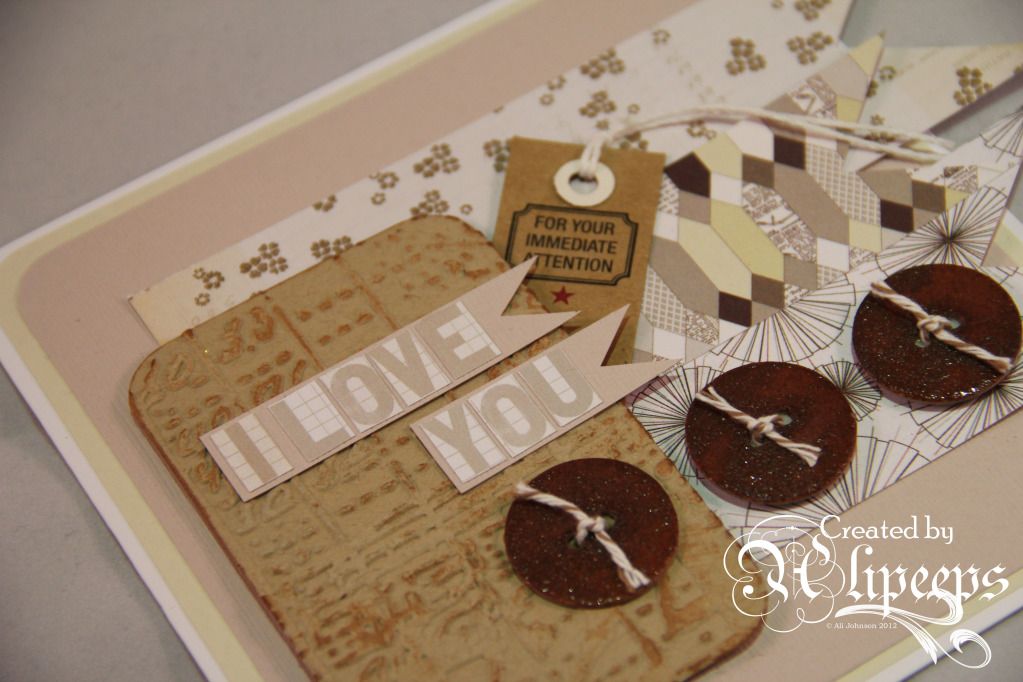
Finally, I made a masculine Valentine's card. To start with, I rounded the corners of a white card blank and then layered cream and beige card, rounding the corners on each. I cut pennants from three patterned papers and layered them onto the card, letting them overhang the edge. I cut a panel of brown card, rounded the corners, and ran it through a Tim Holtz embossing folder. I inked over it a little with Tea Dye Distress Ink and inked the edges then attached it with foam tape, tucking the little tag under the edge.
 
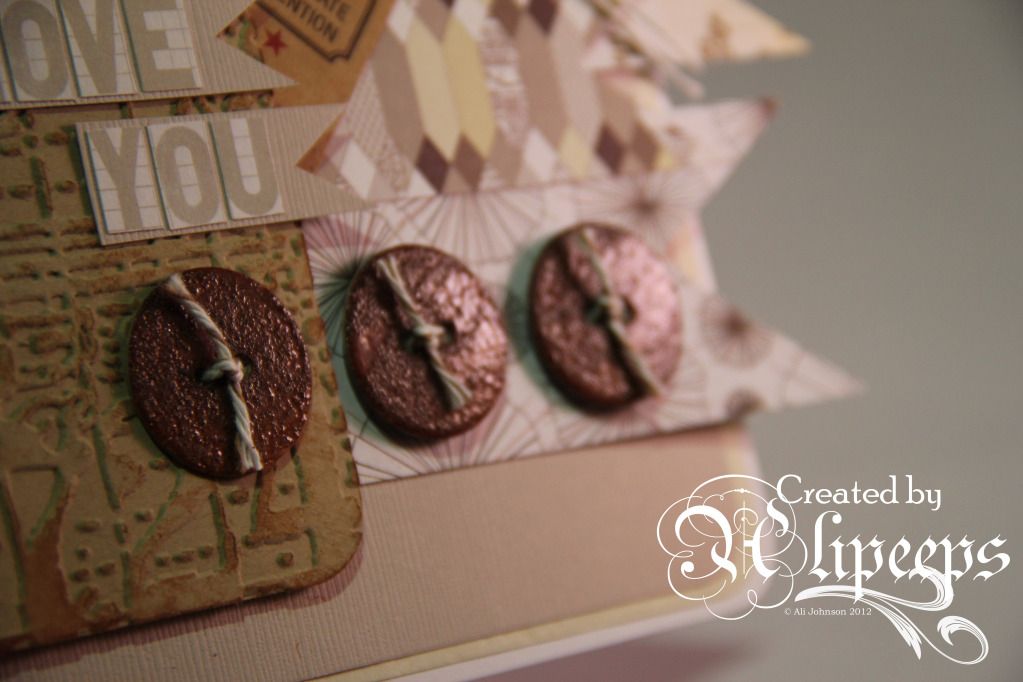
For the buttons, I coated the chipboard buttons in Tea Dye Distress Ink and heat embossed them with clear embossing powder. I then inked them again, randomly, and added Vintage Photo Distress Embossing Powder, knocking some of the powder off before heat embossing. The result is a fab "rusted" effect. I tied baker's twine through the buttons and attached to the card with foam pads. For the title, I cut letters from patterned paper and glued them onto beige cardstock and cut it into pennant shapes before attaching.
 
And that was my little trio of cards. :)
 
You can be in with the chance to win yourself one of these gorgeous mini kits by entering the mini kit challenge - just make a project measuring 12x12" or less and link your entry up at the CCW blog.
 
Related Posts Plugin for WordPress, Blogger...